How to incorporate yourself in ai image generator

How to Incorporate Yourself in an AI Image Generator: The 2026 Blueprint
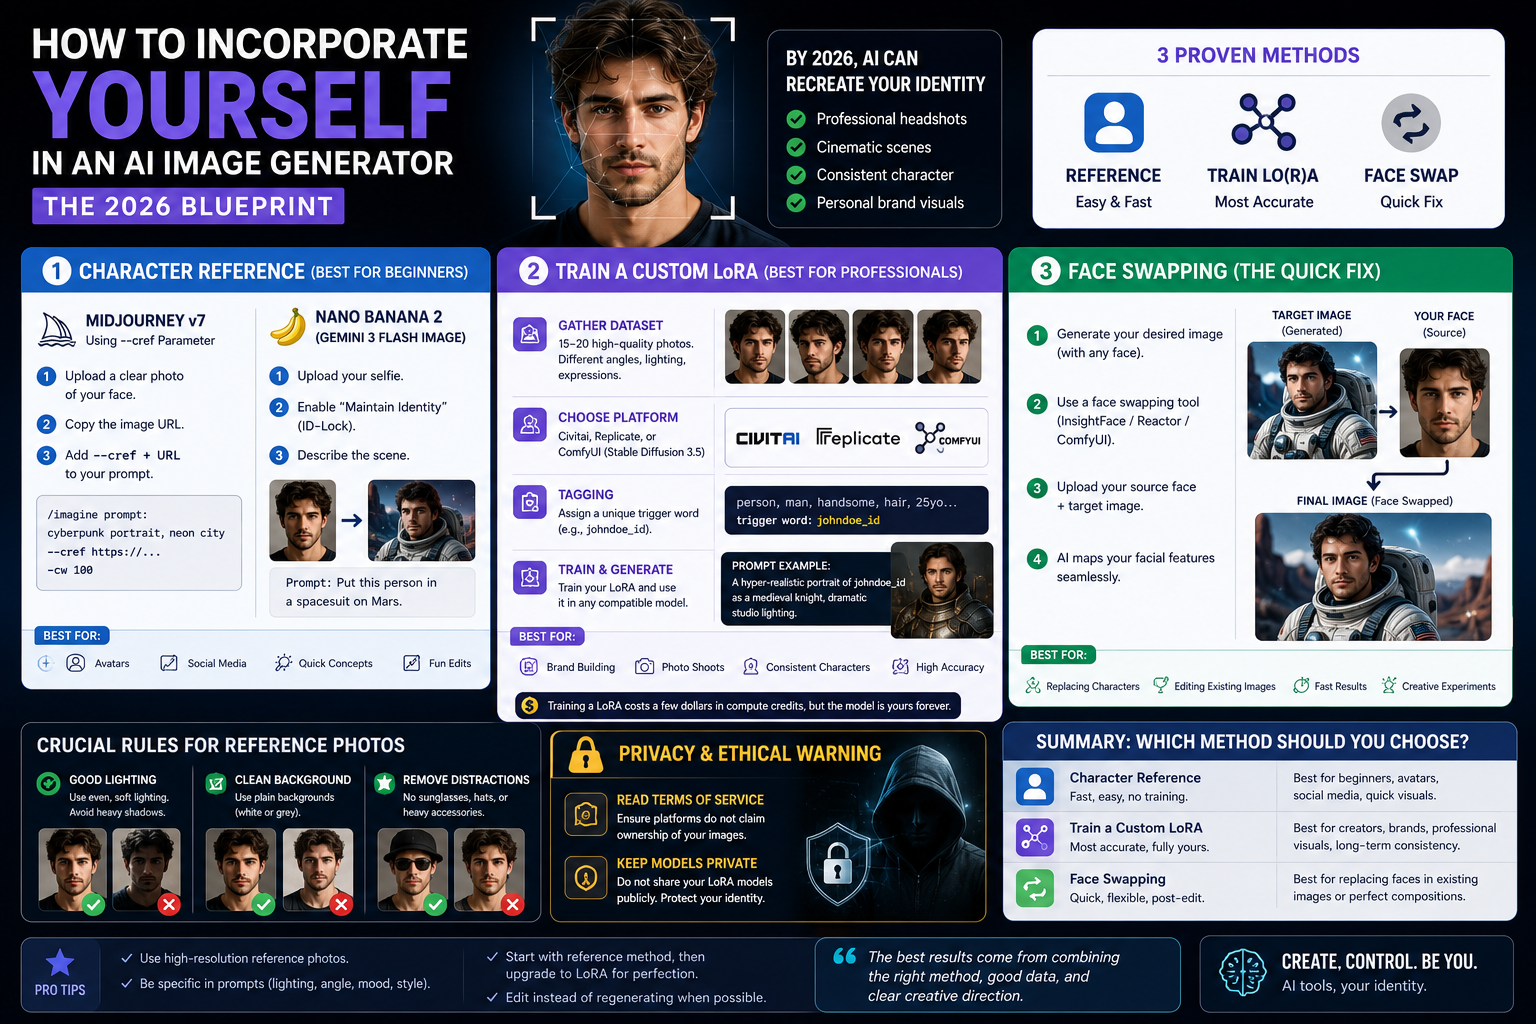
A few years ago, trying to put your own face into an AI prompt usually resulted in a character that looked like your slightly distorted, distant cousin. By 2026, the technology has evolved from unpredictable guesswork to pixel-perfect "ID-locking." Whether you need professional LinkedIn headshots, want to cast yourself in a cyberpunk cinematic scene, or are building a consistent personal brand, learning how to incorporate yourself in an AI image generator is a mandatory digital skill.
Here is the exact step-by-step breakdown of the three industry-standard methods, ranging from beginner-friendly to professional-grade.
Method 1: The "Character Reference" Feature (Best for Beginners)
The fastest way to put yourself into an AI image is using built-in "Character Reference" parameters. You do not need to code or train a model; you simply provide the AI with a source image and tell it to copy the facial structure.
How it works in Midjourney v7:
Upload a clear, well-lit photo of your face to your Discord server or the web interface.
Copy the image URL.
Write your prompt as usual, then add the character reference parameter (https://www.creatok.ai/) followed by the URL.
How it works in Nano Banana 2 (Gemini 3 Flash Image):
Upload your selfie directly into the prompt box.
Select the "Maintain Identity" or "ID-Lock" toggle.
Type your environmental prompt (e.g., "Put this person in a spacesuit on Mars"). The engine automatically isolates your facial embeddings and applies them to the new generation.
Method 2: Training a Custom LoRA (Best for Professionals)
If you need absolute perfection—where the AI knows your profile, your exact smile, and your specific eye shape—you need to train a LoRA (Low-Rank Adaptation). This creates a mini-model completely dedicated to your face.
The Workflow:
Gather the Dataset: You need 15–20 high-quality photos of yourself. Include different angles (profile, 3/4 turn, straight on), different lighting, and different expressions. Crop them to standard sizes (e.g., 1024x1024).
Choose a Training Platform: Platforms like Civitai, Replicate, or local interfaces (like ComfyUI using Stable Diffusion 3.5) allow you to upload your dataset.
Tagging: The platform will automatically caption your photos. You will assign a unique "trigger word" to yourself (e.g., johndoe_id).
Note: Training a LoRA usually costs a few dollars in compute credits on cloud platforms, but the resulting file is yours to keep forever.
Method 3: Post-Generation Face Swapping (The Quick Fix)
Sometimes you generate a perfect image using a generic AI model, and you just want to paste your face onto it afterward. This is where AI face-swapping nodes come in.
The Workflow:
Generate your desired image without worrying about the face. (e.g., "A muscular astronaut looking at the camera").
Use a dedicated swapping tool like InsightFace (available as a Discord bot or a ComfyUI node) or tools like Reactor.
Upload your source image (your face) and the target image (the astronaut).
The AI maps your facial landmarks onto the generated character seamlessly, matching the lighting and skin tone of the target image.
Crucial Rules for Your Reference Photos
Regardless of which method you use, the AI is only as good as the data you feed it. If you are struggling with how to incorporate yourself in an AI image generator successfully, check your source photos against these rules:
No Heavy Shadows: Ensure your face is evenly lit. Heavy shadows on one side of your face will confuse the AI into thinking you have permanent dark marks.
Neutral Backgrounds: Avoid busy backgrounds in your reference photos. A plain white or grey wall prevents the AI from accidentally generating background clutter into your final image.
Remove Accessories: Take off sunglasses, hats, and heavily distracting jewelry, unless you want them permanently baked into every image you generate.
Privacy & Ethical Warning
When you upload your face to train a model or use a reference feature, you are uploading biometric data.
Read the Terms of Service: Ensure you are using platforms that do not claim ownership of uploaded reference images.
Keep Models Private: If you train a custom LoRA on your face, keep the file private (do not publish it on open-source boards), otherwise anyone can generate images using your likeness.
Summary: Which Method Should You Choose?
If you are just having fun or need a quick social media avatar, use the Character Reference features in Midjourney or Nano Banana 2. If you want to replace a character in an already perfect image, use InsightFace. However, if you are a creator building a long-term brand or replacing costly professional photoshoots, investing the time to Train a Custom LoRA is the undisputed best practice in 2026.